

Una guía de instalación profesional para puertas de ducha de vidrio sin marco.
Para fabricantes de vidrio, marcas de mamparas de ducha, contratistas y proyectos de baños de hoteles, un combo de barra para toallas y manija es una solución práctica de ferretería para puertas de ducha de vidrio sin marco. Esta configuración de doble propósito combina una empuñadura interior con agarre discreto y ahorro de espacio con una barra exterior resistente para colgar toallas. Elegir ferretería confiable, como la combinación de barras para toallas y manija Zimmor Hardware Z-5343, ayuda a mantener la puerta de la ducha funcional, estable y visualmente limpia.
Una instalación estable depende principalmente de tres puntos: espaciado correcto de los orificios, colocación adecuada de las juntas y apriete cuidadoso sobre vidrio templado.Esta guía proporciona un recorrido detallado del proceso de instalación, con enfoque en las mejores prácticas técnicas para prevenir daños al vidrio y garantizar un rendimiento fiable a largo plazo.
Tabla de Contenido
- Mecánica Estructural de Ferretería Frente a Frente
- Preparación del Vidrio y Especificaciones Técnicas
- Herramientas Requeridas y Lista de Componentes
- Proceso de Instalación Paso a Paso
- Manejo Seguro y Prevención de Estrés para Vidrio Templado
- Solución de Problemas y Ajuste de Errores Comunes de Alineación
- Mantenimiento y Conservación del Acabado para la Longevidad del Proyecto
- Soluciones OEM y de Fabricación Personalizada Zimmor Hardware B2B
Mecánica Estructural de Ferretería Frente a Frente
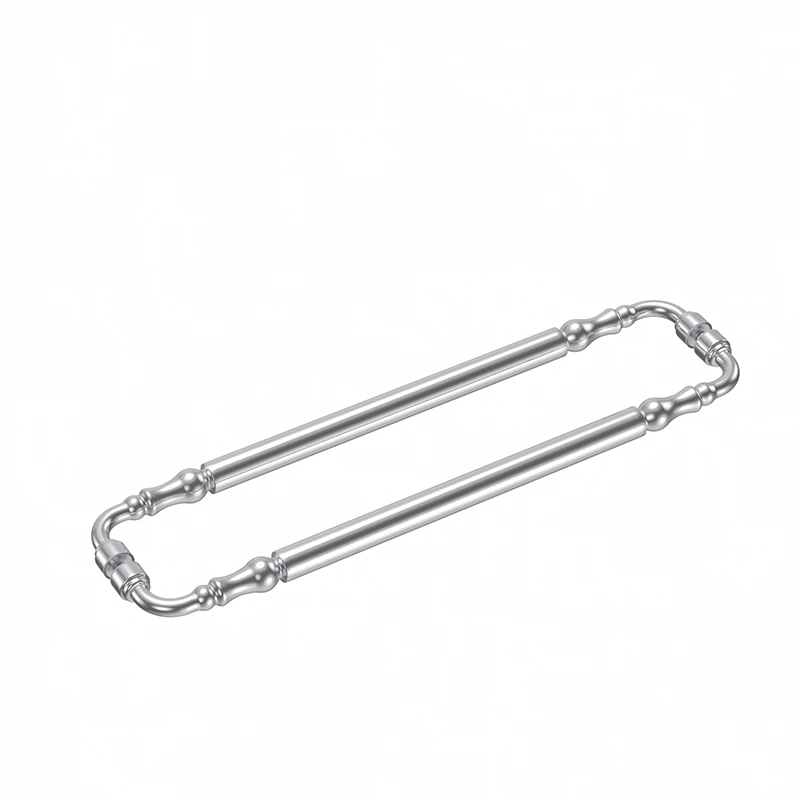
Antes de comenzar el ensamblaje, es útil comprender el diseño físico de esta categoría de ferretería. Una instalación de barra para toallas de ducha frente a frente depende de un mecanismo de sujeción unificado. A diferencia de los percheros independientes, la manija interior y la barra exterior se anclan al vidrio a través de orificios compartidos y preperforados, uniéndose con una varilla roscada central.
El combo barra-manija Z-5343 utiliza este diseño frente a frente en un lado, mientras que el extremo opuesto de la barra más larga se asegura con un pasador de montaje individual del lado exterior. Esta configuración distribuye la fuerza de tracción y empuje de manera uniforme en la cara del vidrio, lo que ayuda a distribuir la carga de forma más pareja en la superficie del vidrio.
Para aplicaciones comerciales y entornos hoteleros de alto tráfico, los componentes de latón macizo son comúnmente preferidos porque ofrecen gran soporte de peso y resistencia confiable a la corrosión. Un sistema de ferretería basado en latón ofrece un soporte excepcional de peso y resistencia a la fatiga estructural, lo que lo convierte en la opción preferida para proyectos de baños comerciales y renovación.
Preparación del Vidrio y Especificaciones Técnicas
La preparación adecuada del vidrio es la base de una instalación estable de barra para toallas de puerta de ducha de vidrio. El vidrio templado no debe perforarse ni modificarse después del temple, ya que esto puede causar su rotura. Todos los orificios deben ser preperforados en la fábrica durante la fase de fabricación, antes del proceso de temple térmico.
Al especificar ferretería para un proyecto, los fabricantes y contratistas deben asegurarse de que los orificios preperforados en el vidrio se alineen con las tolerancias técnicas de la ferretería. Para instalaciones estándar, los siguientes parámetros son típicos:
| Parámetro técnico | Valor estándar | Contexto de ingeniería |
|---|---|---|
| Grosor de vidrio compatible | 6 mm a 12 mm (1/4″ a 1/2″) | Compatible con vidrio arquitectónico residencial sin marco típico y de alta carga comercial. |
| Diámetro de orificio recomendado | 12 mm (1/2″) | Proporciona holgura suficiente para los mangos de aislamiento plástico. |
| Distancia entre orificios (C-C) | 18″ (457 mm) o 24″ (610 mm) | Debe coincidir exactamente con las especificaciones del modelo de barra para toallas seleccionado. |
Siempre confirme el diámetro final del orificio y la distancia centro a centro según el dibujo del producto o la ficha técnica.
Herramientas Requeridas y Lista de Componentes
Contar con las herramientas adecuadas evita daños al vidrio y garantiza un flujo de instalación sin contratiempos. Antes de comenzar, reúna los siguientes elementos:
- Llave hexagonal (llave Allen): Generalmente incluida en el paquete de herrajes para asegurar los tornillos de bloqueo del collar.
- Destornillador: Un destornillador manual estándar para apretar el conjunto roscado principal. Evite taladros eléctricos, ya que pueden aplicar demasiado par fácilmente.
- Cinta de pintor: Útil para sujetar arandelas sueltas durante el alineamiento y proteger la superficie del vidrio de posibles deslizamientos de herramientas.
- Nivel de burbuja: Para verificar que la barra larga para toallas esté nivelada antes de apretar.
- Limpiador de vidrio y paño de microfibra: Para limpiar la superficie alrededor de los orificios predispuestos.
Proceso de Instalación Paso a Paso
Esta sección describe el método preciso para completar el ensamblaje profesional. Para paneles de vidrio arquitectónico de mayor tamaño, se recomienda contar con dos técnicos para manejar el peso y evitar fatiga física durante el ensamblaje.
Paso 1: limpiar el área de instalación
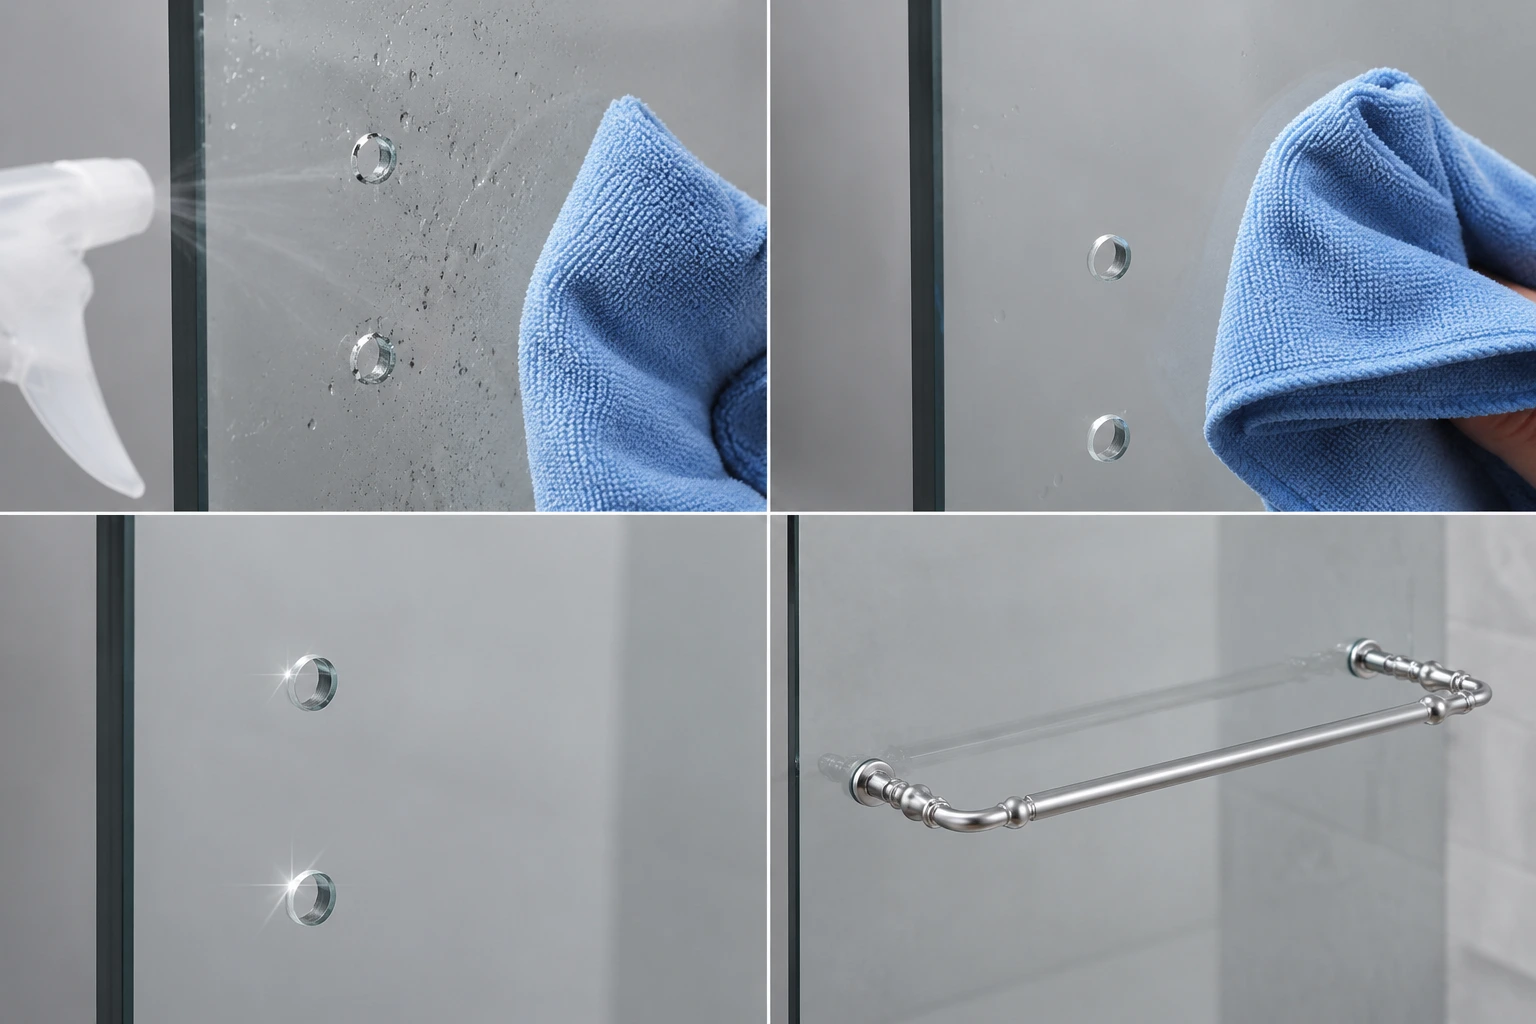
Los escombros o residuos de aceite alrededor de los agujeros predilatados en el vidrio pueden hacer que el herraje se deslice con el tiempo. Limpie ambos lados del panel de vidrio a fondo con un limpiador de vidrio y un paño de microfibra. Deja que la superficie se seque por completo antes de colocar cualquier componente de herraje.
Paso 2: instalar las juntas tóricas y camisas de plástico
Una instalación segura requiere prestar mucha atención a las camisas y arandelas de plástico. Desliza la camisa de aislamiento de plástico dentro del agujero predilatado en el vidrio. A continuación, coloca una arandela de plástico transparente en las caras interior y exterior del agujero del vidrio. Estos componentes no metálicos actúan como amortiguadores críticos, separando el herraje de latón o acero inoxidable del vidrio.
Paso 3: montar el tirador interior
Comienza con el lado de conexión espalda con espalda.
- Inserta el perno conector roscado principal a través del agujero del vidrio desde el lado interior.
- Asegúrate de que las juntas tóricas de plástico permanezcan centradas y enrasadas contra el vidrio en ambos lados.
- Enrosca el perno en el receptáculo del Tirador/Diadema de ducha interior. Apretarlo a mano para mantener el componente en su lugar.
Paso 4: alinear la barra de toallas exterior
A continuación, muévete al lado exterior de la puerta de la ducha para alinear la barra de toallas principal.
- Posiciona un extremo de la barra exterior sobre el vástago roscado expuesto del tirador interior.
- Alinea el extremo opuesto de la barra de toallas sobre el segundo agujero predilatado, insertando el tornillo de montaje de una sola cara (con sus juntas tóricas de plástico correspondientes) desde el lado interior del vidrio.
- Enrosca gradualmente los tornillos en ambos extremos de la barra de toallas a mano. Evita el roscado cruzado alineando los tornillos perpendicularmente a los collares del herraje.
Paso 5: nivelar y apretar el herraje
Antes de apretar definitivamente, coloca un nivel de burbuja sobre la barra de toallas. Si es necesario, realiza ajustes menores dentro de la tolerancia de los agujeros predilatados en el vidrio para asegurarte de que la barra esté nivelada.
Una vez nivelada, aprieta los pernos de montaje principales con un destornillador manual. Aperiétalos firmemente hasta que las arandelas de plástico se compriman ligeramente. Esta compresión ayuda a reducir la filtración de agua y protege la superficie del vidrio de la presión directa.
No aprietes un lado por completo antes de alinear el lado opuesto.
Paso 6: asegurar los tornillos de collar
Localiza los pequeños tornillos de grilla hexagonales (tornillos de fijación) en la parte inferior de los collares de montaje del tirador y la barra de toallas. Utilizando la llave hexagonal, aprieta estos tornillos firmemente. Esto asegura los collares sobre los vástagos de montaje internos, evitando que el tirador se afloje o gire durante el uso diario.
Si la barra no queda plana contra el vidrio, retírala y verifica si la junta tórica o la camisa está desalineada.
Manejo Seguro y Prevención de Estrés para Vidrio Templado
Al manipular el herraje para puertas de ducha sin marco, comprender las propiedades del vidrio templado es crucial. El vidrio templado presenta alta compresión superficial, lo que lo hace excepcionalmente fuerte, pero sigue siendo susceptible al impacto en los bordes y al estrés de carga puntual.
- Asegura una correcta alineación de las arandelas: Nunca permita que las piezas metálicas del mango o barra para toallas toquen el vidrio. El contacto directo de metal sobre vidrio bajo tensión puede provocar microfisuras, que pueden derivar en la rotura del vidrio durante los cambios de temperatura.
- Evite usar herramientas eléctricas: Los martillos de impacto o taladros eléctricos no permiten un control preciso del par de apriete. El sobreapriete puede fracturar fácilmente el vidrio alrededor de los agujeros de montaje.
- Soporte el vidrio durante la instalación: Al montar hardware en paneles sin instalar, coloque siempre el vidrio sobre una alfombrilla de goma blanda o cartón grueso. Evite apoyar las esquinas de los paneles directamente sobre suelos duros de concreto o azulejo.
Solución de Problemas y Ajuste de Errores Comunes de Alineación
Durante instalaciones comerciales de alto volumen, pueden ocurrir problemas menores de alineación. A continuación se presentan situaciones comunes y sus soluciones técnicas:
Problema A: La barra para toallas está fuera de nivel
Solución: Afloje los pernos de montaje en ambos lados ligeramente, permitiendo que el hardware se mueva dentro de los agujeros precortados. Coloque un nivelador sobre la barra, ajústela a la posición horizontal correcta y vuelva a apretar los tornillos mientras sostiene la barra en su lugar.
Problema B: El mango de tirón está suelto o balancea
Solución: Un mango suelto generalmente es causado por tornillos de fijación flojos en el collarín de montaje. Retire ligeramente los tornillos hexagonales de fijación, verifique que los pernos de montaje principales estén completamente apretados y luego vuelva a apretar los tornillos de fijación de forma segura.
Problema C: Faltan juntas o revestimientos
Solución: No sustituya arandelas metálicas por juntas plásticas. Si falta una junta, detenga la instalación y consiga un reemplazo compatible de plástico o silicona para proteger el vidrio del contacto metálico.
Mantenimiento y Conservación del Acabado para la Longevidad del Proyecto
Mantener el acabado del hardware premium de baño es esencial para la calidad a largo plazo del proyecto. La limpieza adecuada previene la acumulación de minerales y la oxidación, especialmente en espacios comerciales con agua de alto mineral.
- Cuidado diario: Limpie la barra para toallas y el mango con un paño suave y seco después de cada uso para evitar manchas de agua y residuos de jabón que puedan corroer la superficie metálica.
- Limpieza semanal: Limpie el hardware con agua tibia y un detergente líquido suave. Evite usar almohadillas abrasivas que puedan rayar las superficies galvanizadas o con recubrimiento en polvo.
- Evite productos químicos agresivos: No use desincrustantes industriales a base de ácido, lejía o amoníaco. Estos productos químicos agresivos pueden eliminar los recubrimientos protectores, provocando decoloración o picaduras en acabados negro mate, cromo pulido y latón.
Soluciones OEM y de Fabricación Personalizada Zimmor Hardware B2B
Para fabricantes globales de recintos de ducha, distribuidores y constructores de contratos, asociarse con un fabricante confiable es clave para garantizar calidad de producto consistente y entrega puntual. Zimmor Hardware es un fabricante profesional, centrado en B2B, especializado en hardware para puertas de ducha sin marco.
Ofrecemos servicios completos de OEM/ODM, permitiendo a los clientes personalizar especificaciones, dimensiones y materiales para adaptarse a proyectos arquitectónicos específicos. A través de nuestras instalaciones de producción avanzadas, ofrecemos una amplia gama de acabados confiables personalizados para hardware de ducha, incluyendo Negro Mate, Oro Cepillado, Latón Satinado, Cromo Pulido y Níquel Cepillado.
Cada producto Zimmor, incluidas nuestras combinaciones especializadas de barra de toallas y tirador, pasa por rigurosos controles de calidad para garantizar un rendimiento duradero y una calidad estable en entornos exigentes. Contacte con Zimmor Hardware para solicitar un presupuesto, dibujo técnico, muestra o soporte para acabados personalizados en su proyecto de barra de toallas y tirador para puerta de ducha.
Índice de la guía: lectura relacionada
¿Compra en volumen? Nuestro Servicio global de entrega y logística envíos a 136 países, y el proceso de inspección de calidad mantiene cada lote en grado de exportación.