

Um guia de instalação profissional para portas de chuveiro de vidro sem moldura.
Para fabricantes de vidro, marcas de boxes de chuveiro, empreiteiros e projetos de banheiros de hotel, uma combinação de barra de toalha e puxador é uma solução prática de ferragens para portas de chuveiro de vidro sem moldura. Esta configuração de dupla função combina um puxador interior elegante e economizador de espaço com uma barra exterior de alta resistência para pendurar toalhas. Escolher ferragens confiáveis, como a Combinação de barras de toalha e puxador Zimmor Hardware Z-5343, ajuda a manter a porta do chuveiro funcional, estável e visualmente limpa.
Uma instalação estável depende principalmente de três pontos: espaçamento correto dos furos, posicionamento adequado das juntas e aperto cuidadoso no vidro temperado.Este guia oferece um passeio detalhado pelo processo de instalação, focando em melhores práticas técnicas para prevenir danos ao vidro e garantir desempenho confiável e duradouro.
Índice
- Mecânica Estrutural das Ferragens Contrapostas
- Preparação do Vidro e Especificações Técnicas
- Ferramentas Necessárias e Lista de Componentes
- Processo de Instalação Passo a Passo
- Manipulação Segura e Prevenção de Tensões no Vidro Temperado
- Solução de Problemas e Ajuste de Questões Comuns de Alinhamento
- Manutenção e Preservação do Acabamento para Longevidade do Projeto
- Soluções de Fabricação OEM e Personalizadas Zimmor Hardware B2B
Mecânica Estrutural das Ferragens Contrapostas
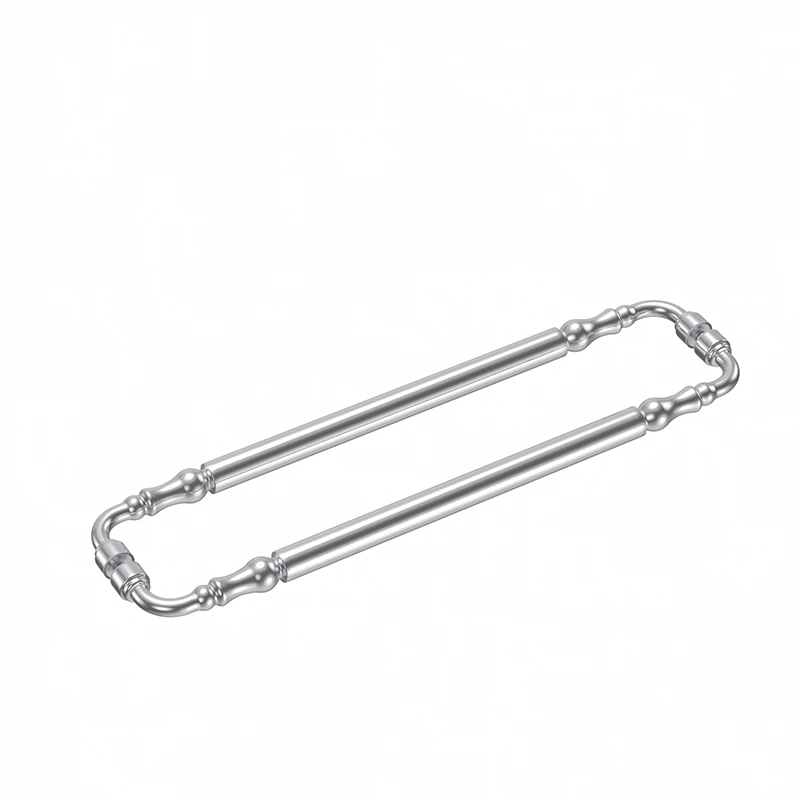
Antes de iniciar a montagem, é útil entender o design físico desta categoria de ferragens. A Instalação da barra de toalha para porta de chuveiro face a face depende de um mecanismo de fixação unificado. Diferente de suporte de toalha independente, a puxadeira interna e a barra externa são fixadas ao vidro através de orifícios compartilhados e pré-trovados, travando juntos com uma haste roscada central.
O conjunto de barra de toalha Z-5343 usa esse design costas com costas de um lado, enquanto a extremidade oposta da barra de toalha mais longa é fixada com um pino de montagem único atravessando o vidro. Esta configuração distribui a força de puxar e empurrar uniformemente pela face do vidro, ajudando a distribuir a carga de forma mais uniforme pela superfície do vidro.
Para aplicações comerciais e ambientes hoteleiros de alto tráfego, componentes de latão maciço são comumente preferidos porque oferecem forte capacidade de suporte de peso e resistência confiável à corrosão. Um conjunto de hardware baseado em latão oferece excepcional suporte de peso e resistência à fadiga estrutural, tornando-se a escolha preferida para projetos de banheiros comerciais e renovações.
Preparação do Vidro e Especificações Técnicas
O preparo adequado do vidro é a base de uma instalação de barra de toalha para porta de chuveiro de vidro. O vidro temperado não deve ser furado ou modificado após o temperamento, pois isso pode causar quebra. Todos os furos devem ser pré-trovados na fábrica durante a fase de fabricação, antes do processo de temperamento térmico.
Ao especificar equipamentos para um projeto, fabricantes e construtores devem garantir que os furos pré-perfurfurados no vidro estejam alinhados com as tolerâncias técnicas dos equipamentos. Para instalações padrão, os seguintes parâmetros são comuns:
| Parâmetro Técnico | Valor Padrão | Contexto de Engenharia |
|---|---|---|
| Espessura de Vidro Compatível | 6mm a 12mm (1/4″ a 1/2″) | Compatível com vidro arquitetônico residencial sem moldura e comercial pesado típico. |
| Diâmetro do Furo Recomendado | 12mm (1/2″) | Fornece folga suficiente para mangas isolantes de plástico. |
| Distância entre Furos (C-C) | 18″ (457mm) ou 24″ (610mm) | Deve corresponder às especificações exatas do modelo de barra de toalhas selecionado. |
Sempre confirme o diâmetro final do furo e a distância centro-a-centro de acordo com o desenho do produto ou a ficha técnica.
Ferramentas Necessárias e Lista de Componentes
Ter as ferramentas adequadas prontas evita danos ao vidro e garante um fluxo de instalação tranquilo. Antes de começar, reúna os seguintes itens:
- Chave Allen (Chave Hexagonal): Geralmente incluída no pacote de ferragens para fixar os parafusos de conjunto do colarinho de travamento.
- Chave de fenda: Uma chave de fenda manual padrão para apertar o conjunto roscado principal. Evite furadeiras elétricas, pois podem aplicar torque demais facilmente.
- Fita de pintor: Útil para fixar arruelas soltas durante o alinhamento e proteger a superfície do vidro contra escorregões de ferramentas.
- Nível de bolha: Para verificar se a barra de toalhas longa está nivelada antes de apertar.
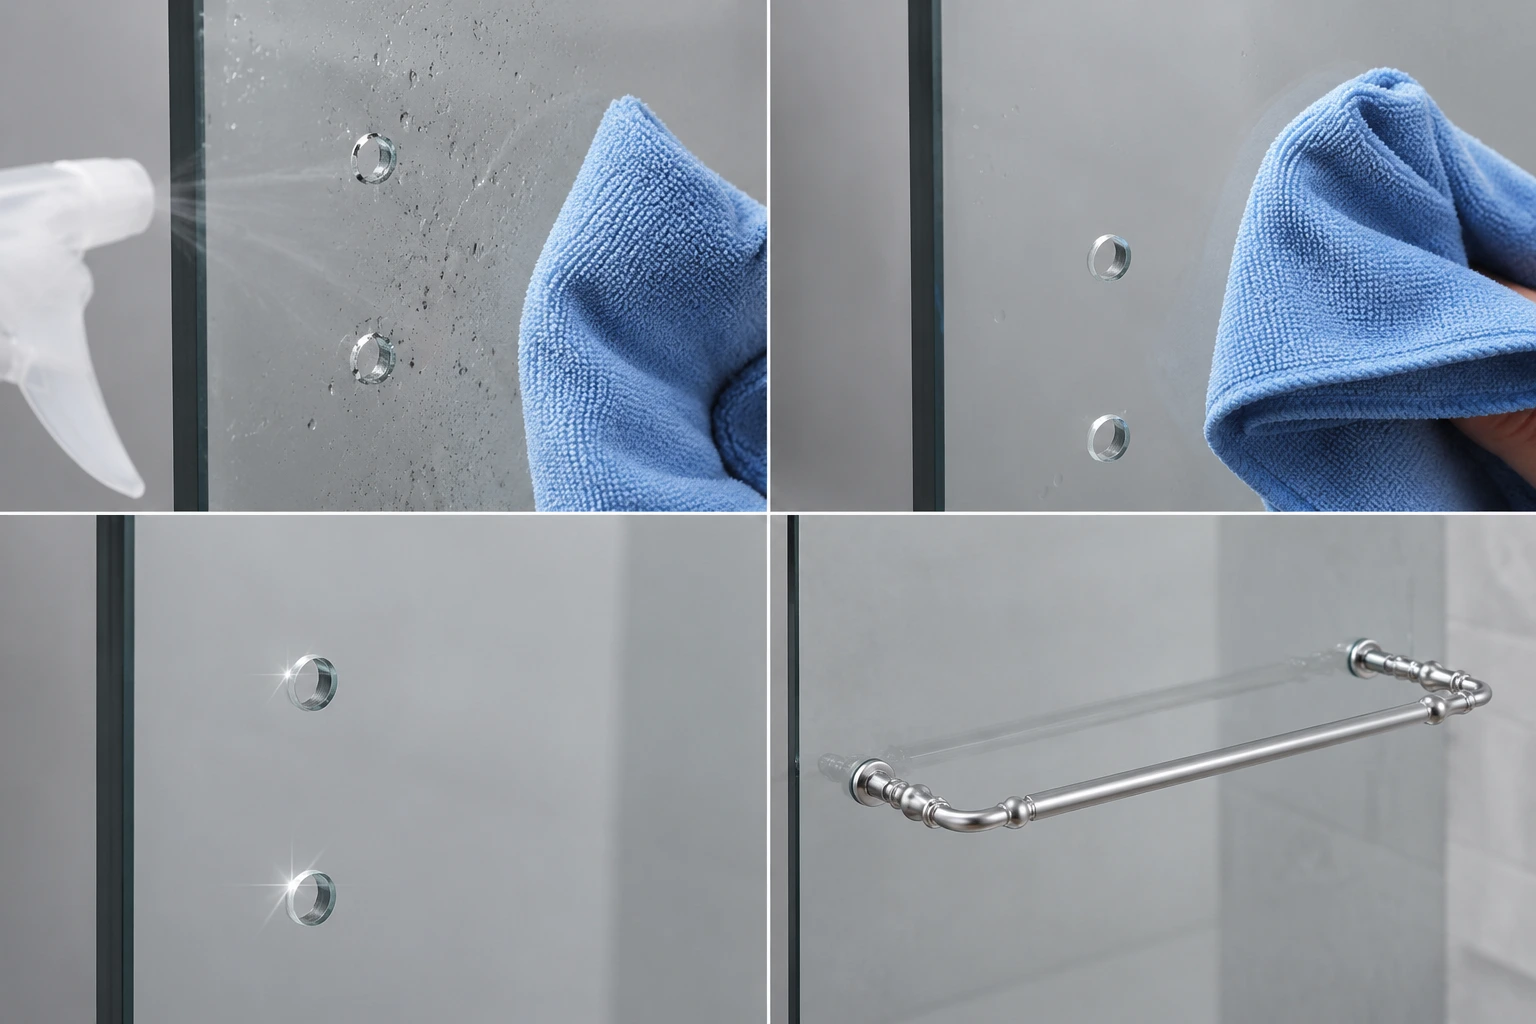
- Limpa-vidros e pano de microfibra: Para limpar a superfície ao redor dos furos pré-perfurfurados.
Processo de Instalação Passo a Passo
Esta seção descreve o método preciso para completar uma montagem profissional.Paras grandes painéis de vidro arquitetônico, recomenda-se a presença de dois técnicos para gerenciar o peso e evitar esforço físico durante a montagem.
Passo 1: Limpar a Área de Instalação
Resíduos ou óleo ao redor dos furos pré-cortados no vidro podem fazer as ferragens escorregarem com o tempo. Limpe ambos os lados do painel de vidro minuciosamente com limpador de vidros e um pano de microfibra. Deixe a superfície secar completamente antes de posicionar qualquer componente das ferragens.
Passo 2: Instalar as Juntas Plásticas e Camisas
Uma instalação segura exige atenção especial às camisas plásticas e arruelas. Insira a camisa de isolamento plástico no furo pré-cortado do vidro. Em seguida, coloque uma arruela plástica transparente em ambos os lados (interno e externo) do furo no vidro. Estes componentes não metálicos atuam como amortecedores críticos, separando as ferragens de latão ou aço inoxidável do vidro.
Passo 3: Montar o Puxador Interno
Comece pelo lado da conexão contraposta.
- Insira o parafuso conector rosqueado principal através do furo do vidro pelo lado interno.
- Certifique-se de que as juntas plásticas permaneçam centralizadas e alinhadas contra o vidro em ambos os lados.
- Rosqueie o parafuso no receptor do Puxador/Botão do Chuveiro interno. Aperte à mão para manter o componente no lugar.
Passo 4: Alinhar a Barra Exterior de Toalha
Em seguida, mova-se para o lado externo da porta do chuveiro para alinhar a barra principal de toalha.
- Posicione uma extremidade da barra exterior sobre o parafuso roscado exposto do puxador interno.
- Alinhe a extremidade oposta da barra de toalha sobre o segundo orifício pré-talhado, inserindo o parafuso de montagem de rosca única (com suas respectivas argolas de plástico) pelo lado interno do vidro.
- Encaixe os parafusos nas duas extremidades da barra de toalha manualmente. Evite o rosqueamento cruzado alinhando os parafusos perpendicularmente às buchas dos acessórios.
Passo 5: Nivelar e Apertar os Acessórios
Antes do aperto final, coloque um nível de bolha sobre a barra de toalha. Se necessário, faça pequenos ajustes dentro da tolerância dos furos do vidro para garantir que a barra esteja nivelada.
Após o nivelamento, aperte os parafusos de montagem principais com uma chave de fenda manual. Aperte firmemente até que as porcas plásticas se comprimam ligeiramente. Essa compressão ajuda a reduzir a infiltração de água e protege a superfície do vidro contra pressão direta.
Não aperte completamente um dos lados antes de alinhar o lado oposto.
Passo 6: Fixar os Parafusos de Fixação das Buchas
Localize os pequenos parafusos sextavados (parafusos de aperto) na parte inferior das buchas de montagem da alça e da barra de toalha. Com a chave hexagonal, aperte esses parafusos firmemente. Isso fixa as buchas nos hastes de montagem internas, impedindo que a alça afrouxe ou gire durante o uso diário.
Se a barra não ficar alinhada contra o vidro, remova-a e verifique se a junta ou a manga está dessalinhada.
Manipulação Segura e Prevenção de Tensões no Vidro Temperado
Ao manusear os acessórios de portas de box sem moldura, entender as propriedades do vidro temperado é crucial. O vidro temperado possui alta compressão superficial, tornando-o excepcionalmente resistente, mas continua suscetível a impactos nas bordas e tensões em pontos específicos.
- Certifique-se de que as argolas estejam alinhadas corretamente: Nunca permita que as partes metálicas da alça ou da barra de toalha toquem o vidro. O contato direto de metal com vidro sob tensão pode levar a microfraturas, que podem resultar na quebra do vidro durante variações de temperatura.
- Evite o uso de ferramentas elétricas: Impact drivers ou furadeiras elétricas não permitem controle preciso de torque. O aperto excessivo pode facilmente fraturar o vidro ao redor dos orifícios de montagem.
- Suporte o vidro durante a instalação: Ao montar os acessórios em painéis ainda não instalados, coloque sempre o vidro sobre um tapete de borracha macia ou papelão grosso. Evite apoiar os cantos dos painéis diretamente em pisos de concreto ou azulejo rígidos.
Solução de Problemas e Ajuste de Questões Comuns de Alinhamento
Durante instalações comerciais de alto volume, podem ocorrer pequenos problemas de alinhamento. Abaixo estão situações comuns e suas soluções técnicas:
Problema A: A Barra de Toalha Está Desenivelada
Solução: Afrouxe levemente os parafusos de fixação em ambos os lados, permitindo que a ferragem se mova dentro dos furos pré-perfurados. Coloque um nível sobre a barra, ajuste-o para a posição horizontal correta e reaperte os parafusos mantendo a barra no lugar.
Problema B: A Alça de Puxo está Solta ou Balança
Solução: Uma alça solta é geralmente causada por parafusos de fixação frouxos no colar de montagem. Afrouxe levemente os parafusos sextavados de fixação, verifique se os parafusos principais de montagem estão totalmente apertados e, em seguida, reaperte os parafusos de fixação com firmeza.
Problema C: Anéis de Vedação ou Mangas Ausentes
Solução: Não substitua arruelas metálicas por anéis de vedação de plástico. Se um anel de vedação estiver ausente, pause a instalação e obtenha uma peça de substituição compatível de plástico ou silicone para proteger o vidro do contato com metal.
Manutenção e Preservação do Acabamento para Longevidade do Projeto
Manter o acabamento de ferragens premium de banheiro é essencial para a qualidade do projeto a longo prazo. A limpeza adequada previne o acúmulo de minerais e a oxidação, especialmente em espaços comerciais com água de alto teor mineral.
- Cuidado Diário: Seque a barra de toalha e a alça com um pano macio e seco após o uso para evitar que manchas de água e resíduos de sabão corroam a superfície metálica.
- Limpeza Semanal: Limpe as ferragens com água morna e um detergente líquido suave. Evite o uso de esponjas abrasivas, que podem riscar superfícies eletrogalvanizadas ou com revestimento em pó.
- Evite Produtos Químicos Agressivos: Não use descalcificantes ácidos industriais, cloro ou amônia. Esses produtos químicos agressivos podem remover revestimentos protetores, causando escurecimento ou corrosão por pites em acabamentos preto fosco, cromo e latão.
Soluções de Fabricação OEM e Personalizadas Zimmor Hardware B2B
Para fabricantes de cabines de chuveiro, distribuidores e construtores de contratos em todo o mundo, estabelecer parcerias com um fabricante confiável é fundamental para garantir qualidade consistente do produto e entrega pontual. A Zimmor Hardware é um fabricante profissional, focado em B2B, especializado em ferragens para portas de chuveiro sem moldura.
Oferecemos serviços abrangentes de OEM/ODM, permitindo que os clientes personalizem especificações, dimensões e materiais para atender a projetos arquitetônicos específicos. Por meio de nossas instalações de produção avançadas, fornecemos uma ampla variedade de acabamentos confiáveis para ferragens de chuveiro sob medida, incluindo Preto Fosco, Dourado Escovado, Latão Satinado, Cromo Polido e Níquel Escovado.
Todo produto Zimmor, incluindo nossos combos especiais de barra de toalha com alça, passa por verificações rigorosas de qualidade para garantir desempenho a longo prazo e qualidade estável em ambientes exigentes. Entre em contato com a Zimmor Hardware para solicitar um orçamento, desenho técnico, amostra ou apoio com acabamento personalizado para seu projeto de combo de barra de toalha e alça para porta de chuveiro.
Índice do guia: leituras relacionadas
Compra em volume? Nosso serviço global de entrega e logística envia para 136 países, e o processo de inspeção de qualidade mantém cada lote no padrão de exportação.