Most frameless shower door failures are decided before a single hole is drilled. If you came here to learn how to install a frameless shower door, accept the truth every seasoned glazier lives by: the drilling is the easy part. The callbacks — water pooling at the threshold, doors that sag within a season, glass that will not close square — almost always trace back to a skipped measurement, an out-of-plumb wall, or a hinge spec that never matched the panel weight.
You already know glass does not forgive. A 60- to 90-pound tempered panel will expose every shortcut you took at the template stage. Most results are cheerful homeowner walkthroughs. This isn’t — it’s a trade-level sequence for glass fabricators, shower enclosure brands, contractors, and hotel or commercial install crews. We cover the pre-install checks that protect your margin, the glass and hardware specs that prevent returns, and the step-by-step method for both hinged and sliding systems. We also point you to deeper resources on hinge selection and leak correction so this page stays focused on the install itself — in short, a complete frameless shower door installation guide from template to cure.
One clarification up front: general advice on how to install glass shower door systems also covers framed and semi-frameless units, where a perimeter frame shares the load. Frameless enclosures put that structural duty entirely on thicker tempered glass and load-rated hardware — which is exactly why the pre-install discipline below matters more here than anywhere else.
Who This Guide Is For
This is not a weekend-DIY hand-holding piece. Zimmor has manufactured frameless shower hardware since 1999 and now supplies partners in 136 countries, so we write from the fabrication and distribution side of the table. The guidance below assumes you are one of the following:
- Glass fabricators and shower enclosure brands specifying hardware for production runs or custom cut-to-size orders.
- Glazing and tile contractors installing enclosures on residential remodels, multi-unit developments, or hospitality projects.
- Procurement and project leads responsible for consistent, defect-free installs across a portfolio of bathrooms.
- Facility and maintenance teams supporting hotels, gyms, and commercial washrooms where a single leak becomes a liability fast.
If your job is to make the enclosure go in once, go in square, and stay watertight, then this is your page. The principles apply whether you are hanging a single 3/8-inch door in a condo or coordinating forty identical enclosures across a hotel floor.
Pre-Installation Checklist (3 Non-Negotiables)
Before any box is opened, three checks separate a clean install from a costly return. Skip one and the rest of this guide cannot save you.
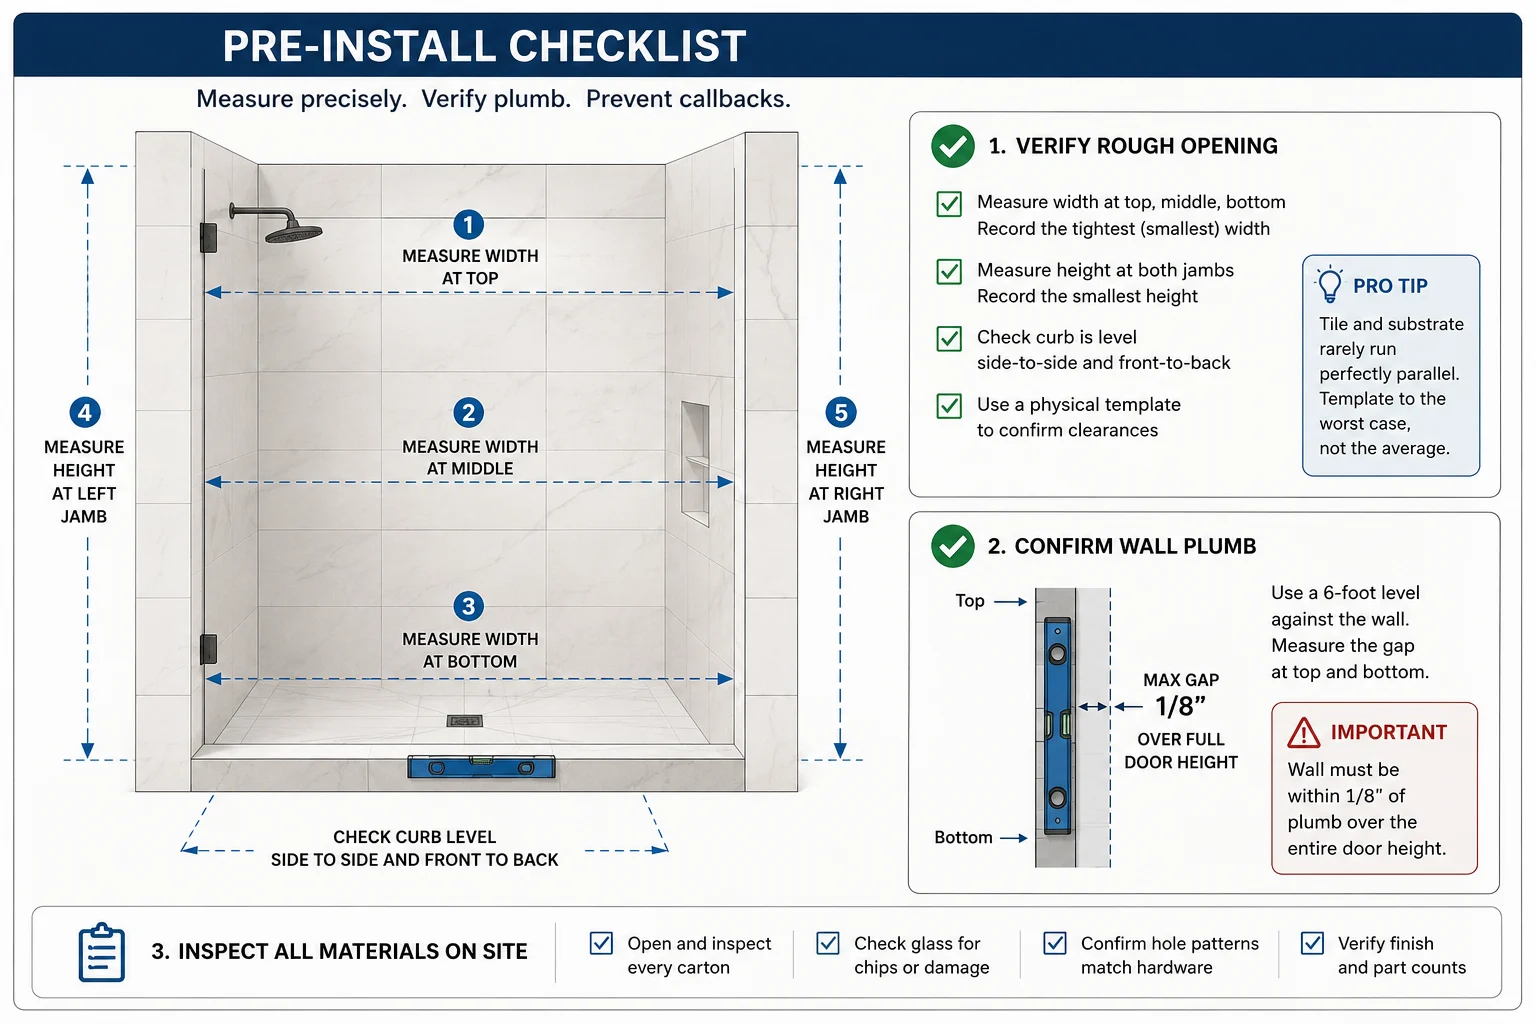
1. Verify the rough opening with a physical template. Measure the finished width at three heights and the height at both jambs. Tile and substrate rarely run perfectly parallel. Record the tightest dimension, not the average — you template to the worst case.
2. Confirm wall verticality within 1/8 inch over the door height. This is the single most violated rule in the trade. A frameless panel has no frame to hide a 1/4-inch bow. Set a 6-foot level against the wall and measure the gap top to bottom.
3. Open and inspect every carton before the crew leaves the warehouse. Check glass for edge chips, confirm hole patterns match your hinges, and verify finish counts. A missing 90-degree hinge discovered on site is a lost day.
Last spring a glazier lost an entire morning on a luxury condo because he trusted the builder’s stated 72-inch opening. The finished tile channel measured 71-5/8 at the top and 72-1/8 at the bottom — a 1/2-inch taper. The 1/2-inch tempered panel he had fabricated on spec would not seat. The glass went back for re-cut, the tile had to be protected from a second visit, and the client’s move-in date slipped. That failure happened at the tape measure, not at the drill.
Tools & Materials You’ll Need
Before you template anything, get the kit on the floor right. These are the tools we expect on a professional job:
- Variable-speed drill with a wet diamond core bit (for tile and stone)
- Laser level or 6-foot spirit level and a plumb bob
- Glass suction cups (two, rated for the panel weight)
- Torque wrench or calibrated hex driver for hinge hardware
- Setting blocks (neoprene or PVC) for glass support
- Neutral-cure silicone rated for wet areas (never acetoxy near metal)
- Backer rod for deep joints
- Masking tape and a sharp utility knife for clean seal lines
- Measuring tape, marker, and a cardboard template
- Appropriate wall anchors matched to the substrate (see Mounting Hardware)
Materials beyond the glass and hardware include the hinge set, glass clamps or U-channel, sweeps and seals, setting blocks, and the correct anchor package. Have spares on site. A stripped anchor in a tiled wall is far easier to replace from the truck than from a supply house.
Frameless Shower Door Glass Thickness & Specs to Confirm Before You Drill
Drilling into the wrong glass is irreversible. Confirm these specs against the panel fabrication ticket before you pick up a bit.
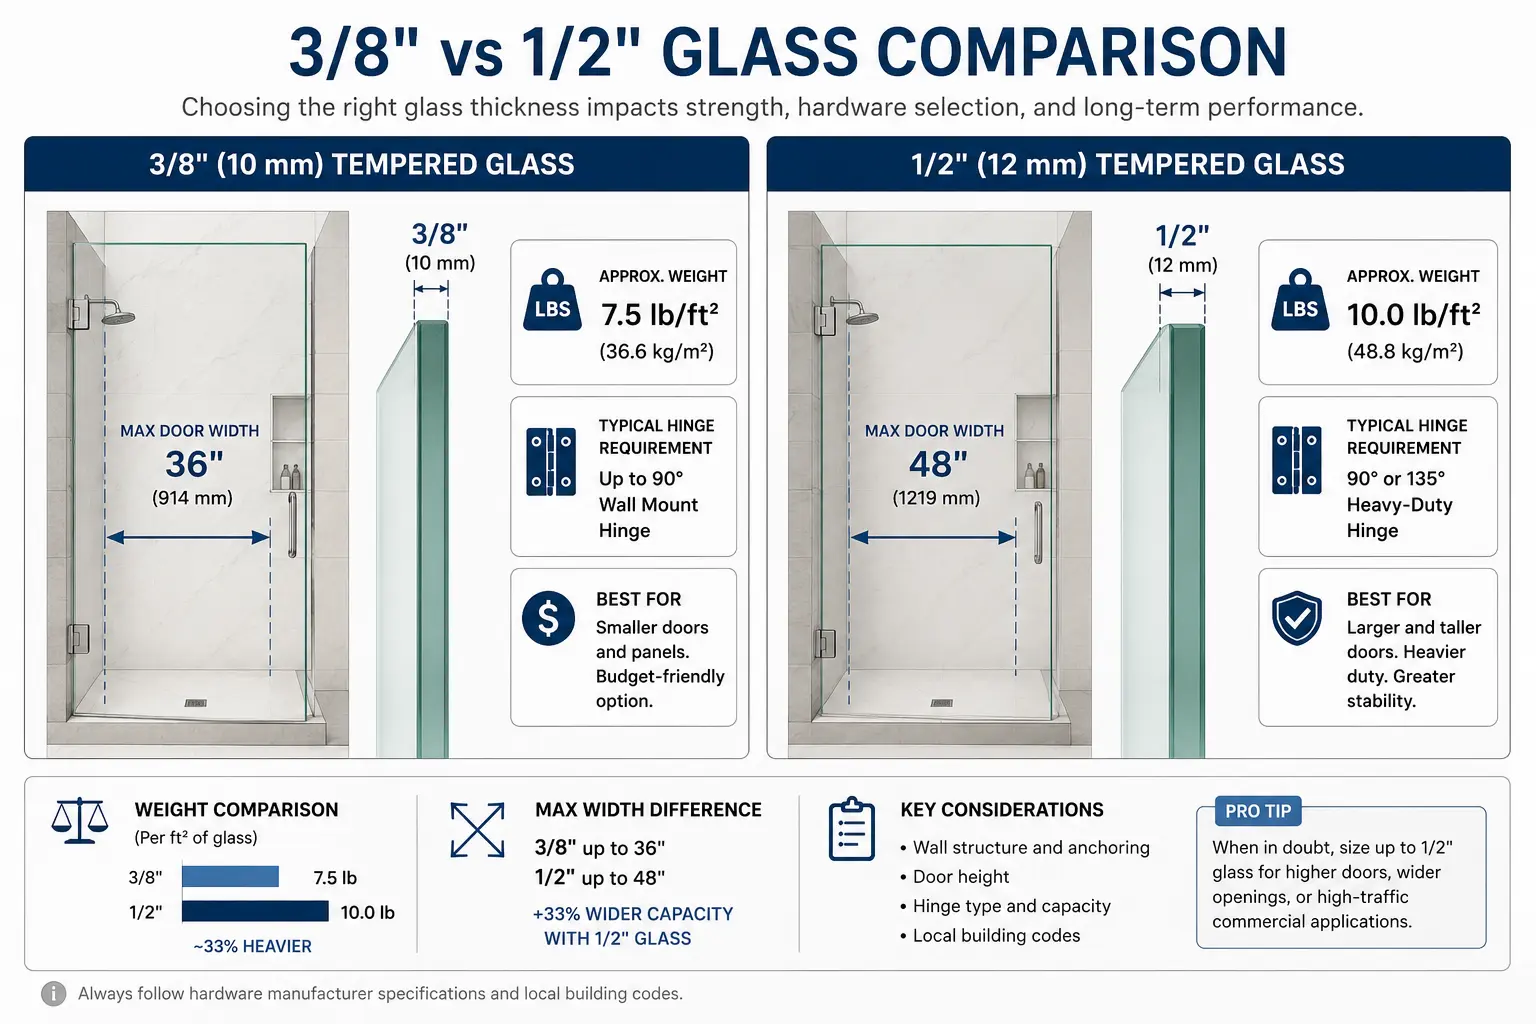
Thickness: 3/8 inch (10 mm) vs 1/2 inch (12 mm). The frameless shower door glass thickness you choose sets every downstream limit. The National Glass Association’s frameless enclosure design guide sets hard numbers. A 3/8-inch panel supports a maximum height of 84 inches and a maximum width of 30 inches with an unsupported top corner. A 1/2-inch panel reaches 120 inches tall and 36 inches wide under the same condition. If your door or fixed panel exceeds those numbers, the glass is under-specified and will flex or fail at the hinge.
At a glance — 3/8 vs 1/2 inch glass:
| Glass thickness | Max height | Max width (unsupported top corner) | Weight / sq ft | Hinge count (typical) |
|---|---|---|---|---|
| 3/8 in (10 mm) | 84 in | 30 in | ~5 lb | 2 (door ≤ 80 lb, ≤ 30 in wide) |
| 1/2 in (12 mm) | 120 in | 36 in | ~6.5 lb | 3–4 (heavier or taller than 78 in) |
Weight drives everything. 3/8-inch tempered glass weighs roughly 5 lbs per square foot; 1/2-inch runs about 6.5 lbs. A 28-by-74-inch door is ~60 lbs in 3/8 and ~78 lbs in 1/2. That difference decides your hinge count.
Tempered safety glass is mandatory. US enclosures must meet ANSI Z97.1 / CPSC 16 CFR 1201, and fabrication tolerances follow ASTM C1048. Specify heat-soaked tempered to eliminate nickel-sulfide inclusions that cause rare spontaneous breakage. Annealed glass has no place in a shower.
Hinge count follows door weight, not habit. A standard swing door under about 80 lbs and 30 inches wide takes two hinges. Doors from 80 to 120 lbs, or taller than 78 inches, need three. Very large or heavy panels run four. Get the count wrong and you’ll be back in eighteen months chasing a door that drags the threshold. Get it right and it swings true for a decade. Our full write-up on our frameless shower door hinge selection guide breaks the load tables down by panel size.
Step-by-Step: Installing a Hinged (Swing) Frameless Door
Quick answer — how to install a frameless shower door in 6 steps: (1) dry-fit panels and verify the rough opening; (2) confirm walls are plumb within 1/8 in; (3) drill the wall with a wet diamond core bit and set anchors; (4) mount hinges to the glass, then lift to wall brackets; (5) hang the door, check the reveal, and adjust ±3°; (6) install the handle and seal with neutral-cure silicone, then allow 48–72 h to cure.
This sequence assumes your three pre-install checks passed and your glass matches spec.
Preparation (Steps 1–2)
1. Dry-fit the panels. Stand the fixed panel in the opening on setting blocks. Check plumb and the gap to the wall. No fasteners yet.
2. Mark hinge and clamp locations on the wall and glass using the template. Confirm the door swing clears the toilet and vanity.
Drilling & Anchoring (Steps 3–4)
3. Drill the wall with a wet diamond core bit at the marked points. Keep the drill perpendicular and let the bit do the work.
4. Set anchors appropriate to the substrate (see Mounting Hardware). Do not overtighten into tile — snug, then verify.
Mounting, Hanging & Sealing (Steps 5–9)
5. Mount the hinges to the door glass first, then lift and attach the assembly to the wall brackets with suction cups supporting the weight.
6. Hang the door and check the reveal. The gap between door and fixed panel should be even top to bottom.
7. Adjust using the hinge’s built-in adjustment (typically ±3 degrees) until the door self-centers and clears the sweep.
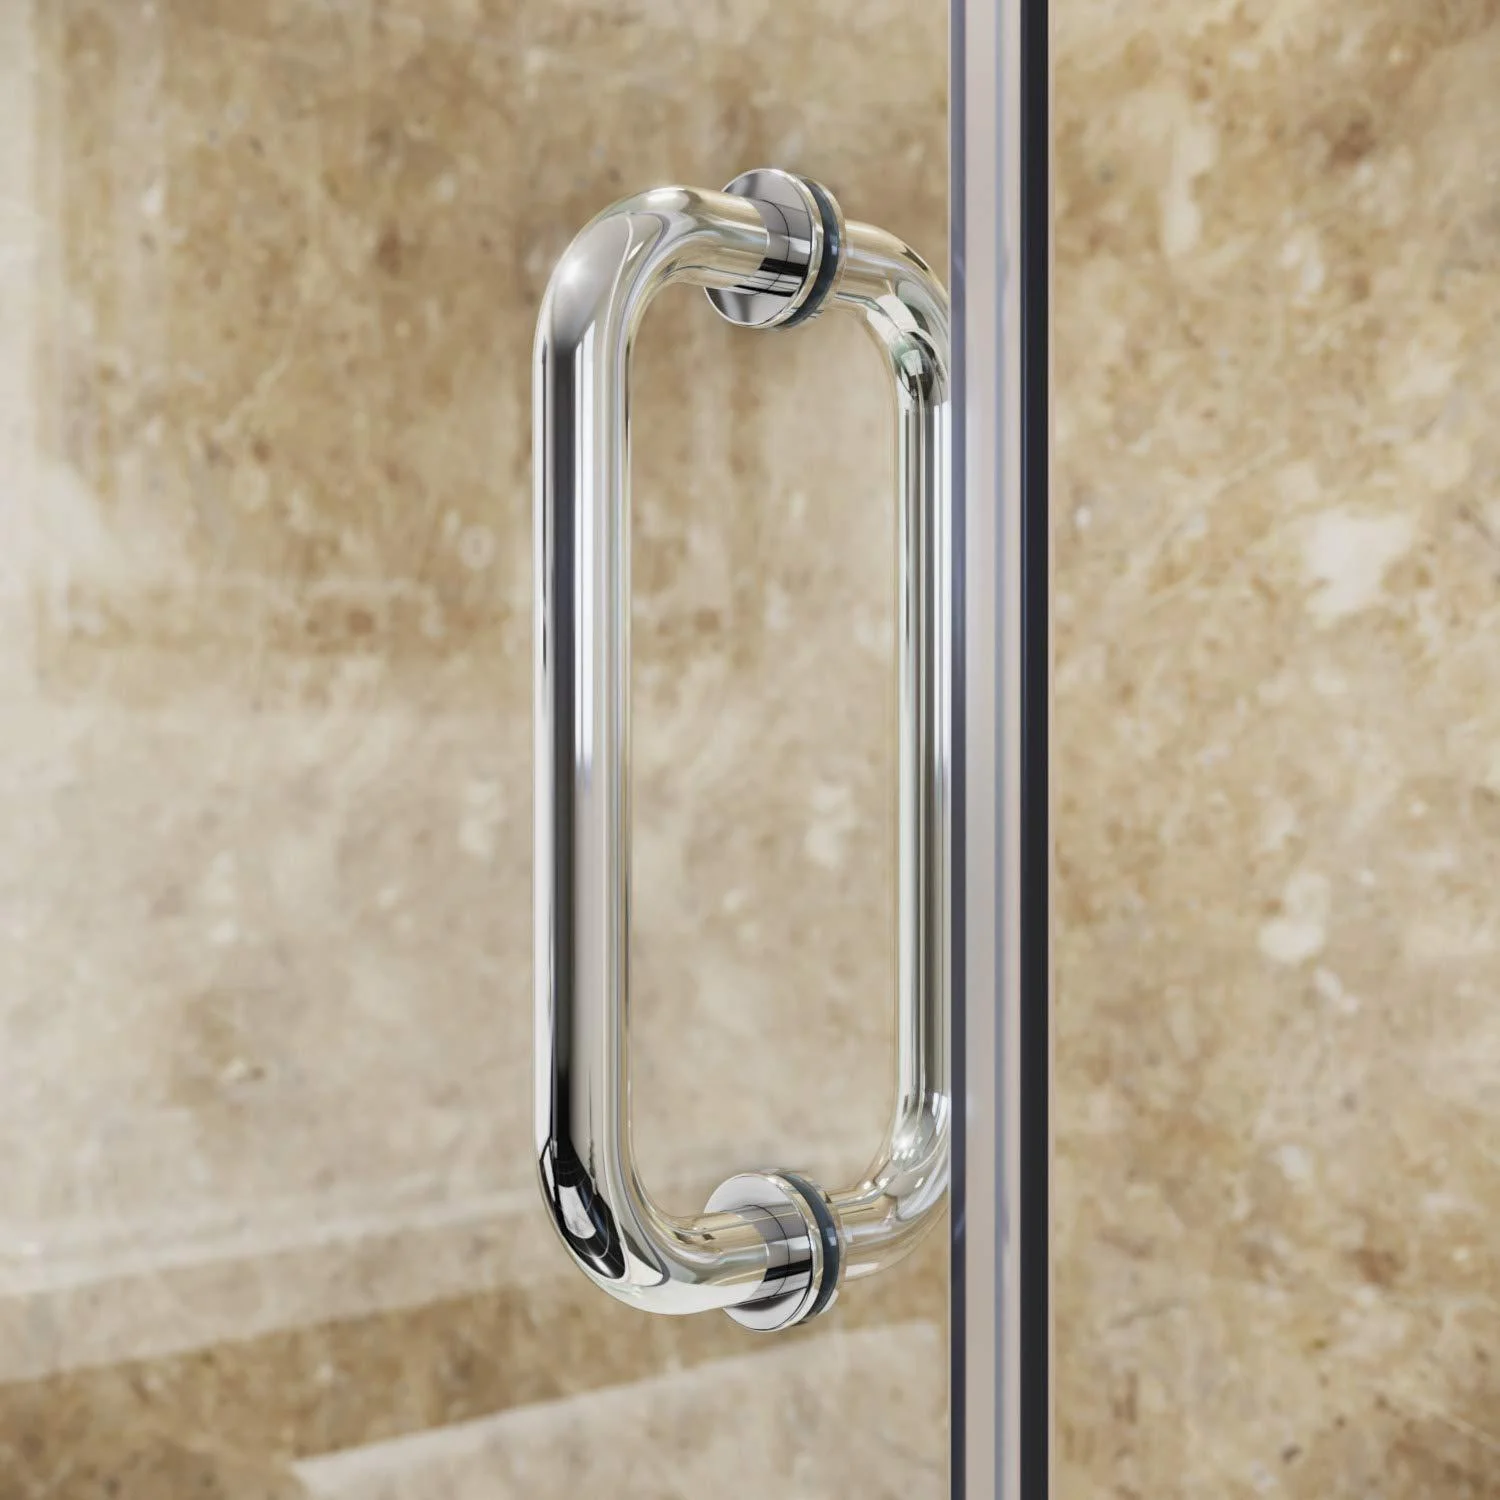
8. Install handle and any towel bar per the fabrication drawing. For a clean, code-compliant attachment method, see our dedicated towel-bar + handle combo guide.
9. Seal per Silicone Sealing & Waterproofing, then cure undisturbed.
Step-by-Step: Installing a Sliding Frameless Door
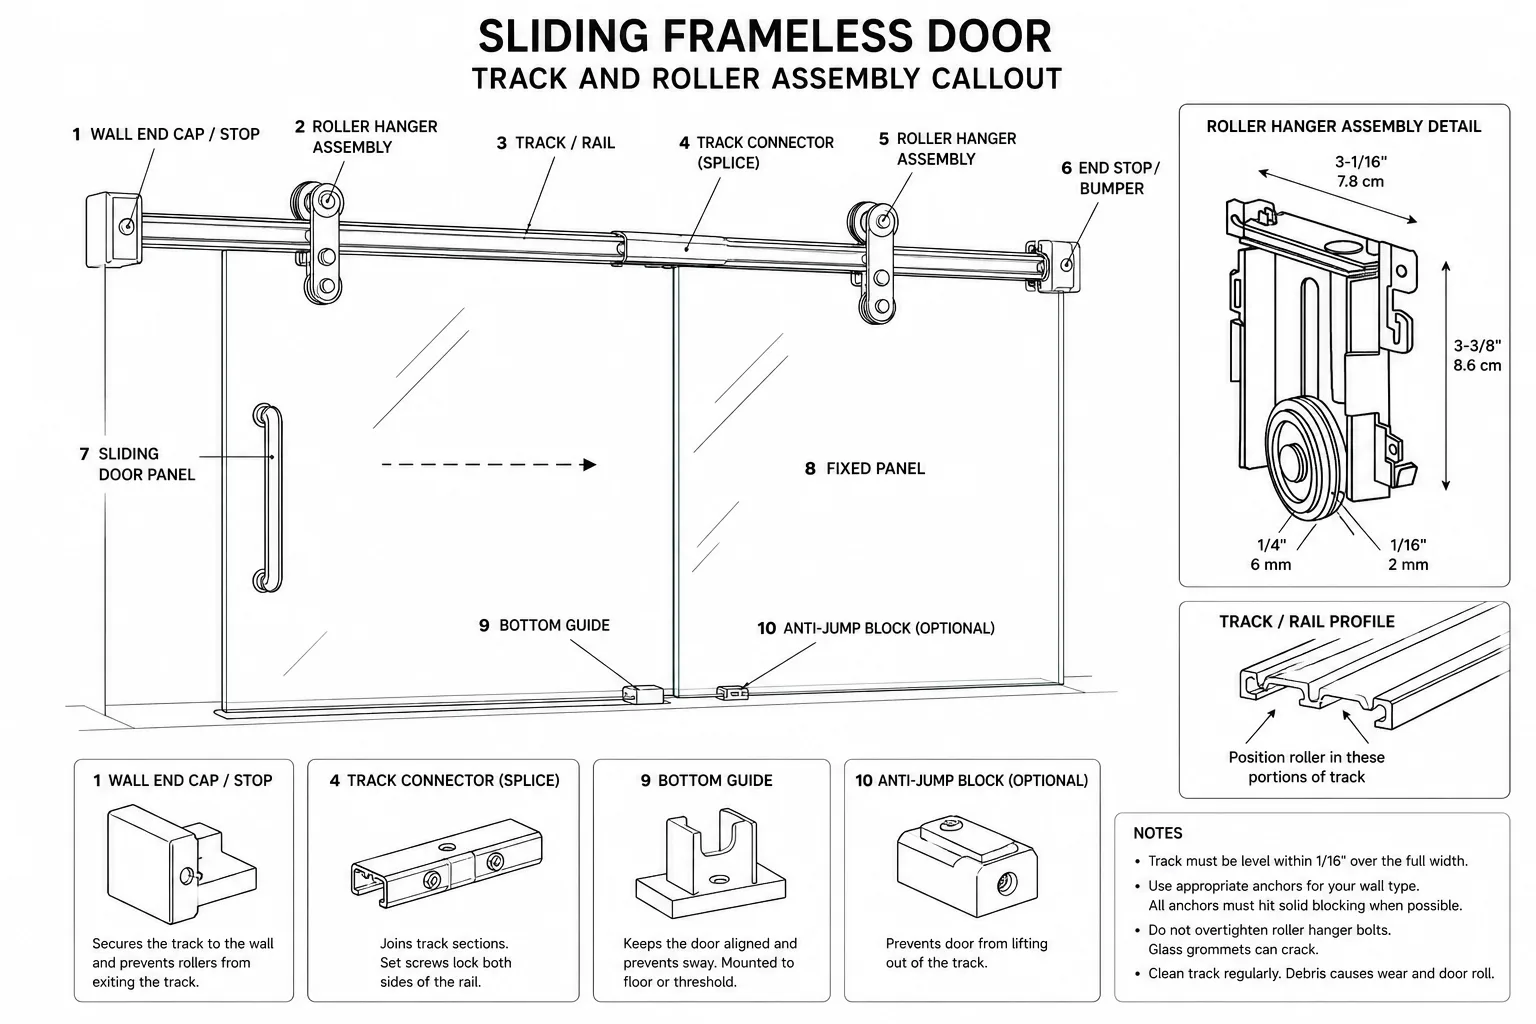
Sliding systems trade hinge load for top-track and roller precision.
Preparation (Steps 1–2)
1. Dry-fit the stationary panel and confirm plumb against the wall and curb.
2. Install the wall channel or clamps and the threshold track or U-guide at the floor.
Track & Rollers (Steps 3–5)
3. Set the top track level within 1/16 inch across its length — a level track is the whole job.
4. Hang the rollers on the moving panel and lift it onto the track. Rollers should run silent and centered.
5. Adjust the door overlap over the fixed panel so the seals meet without binding.
Test & Seal (Steps 6–7)
6. Test the glide ten times. The panel should coast and stop without drifting open or slamming.
7. Fit the bottom sweep and side seals, then seal the track-to-tile joints per Silicone Sealing & Waterproofing.
The handle and towel bar attachment for sliding doors follows the same dedicated towel-bar + handle combo guide referenced above — keep that sub-step on its own page to avoid duplicating detail here.
Mounting Hardware: Hinges, Clamps & Wall Anchors
Hardware is where frameless installs win or lose. Three decisions matter.
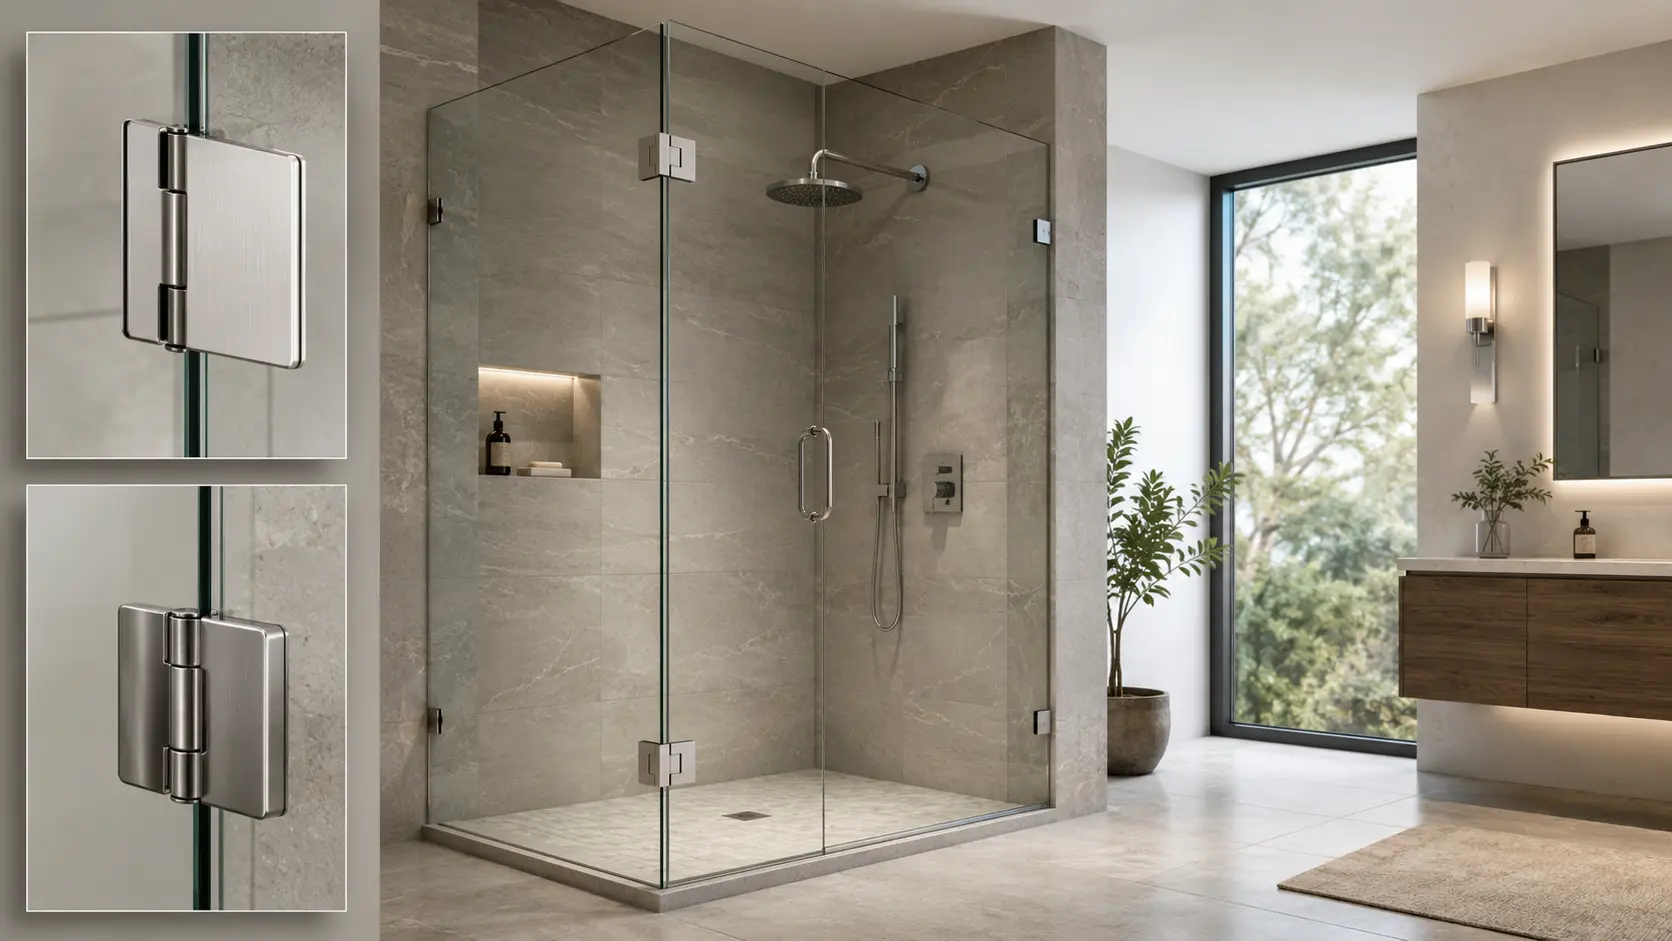
Wall-to-glass vs glass-to-glass hinges. Wall-to-glass hinges mount the door to a structural wall or stud wall and are the default for standard openings. Glass-to-glass hinges connect the door to an adjacent fixed panel — essential for return panels, neo-angle corners, and enclosures with limited wall support. Choose the geometry before you template the glass, because hole patterns differ.
Match anchors to the substrate. Tile over cement board over studs takes through-bolts into blocking or studs. Tile set directly on drywall with no backing behind the fastening line is the highest-risk condition in the NGA guide — you must hit a stud or use a verified heavy-duty anchor rated for the pull-out load, and you should flag it to the specifier. Never trust a plastic anchor in a hollow drywall shower wall.
Torque in sequence. Tighten hinge screws in a cross pattern, partially first, then to spec. Snugging one side fully before the other twists the glass and cracks the edge. A fabricator partner of ours once shipped a run of doors spec’d with two hinges for a panel that weighed 95 lbs after the client upgraded to 1/2-inch glass. The doors sagged, the bottom sweep dragged, and every unit needed a third hinge retrofitted on site. The fix cost more than specifying correctly the first time.
For hinge geometry, load tables, and finish options, see our how to choose shower door hinges resource, and browse the full shower hardware and shower door hinges lines.
Silicone Sealing & Waterproofing
Sealing is precision work, not caulk-everything. Know where to seal and where to leave a path.
Seal these joints: the glass-to-wall interface, the fixed panel-to-curb junction, and the track-to-tile lines on sliders. A continuous neutral-cure bead here is your water barrier.
Do not seal the door sweep line or the hinge knuckle gap. The door must breathe; trapping water against hardware accelerates corrosion and mold. Leave the bottom sweep’s weep path open.
Use neutral-cure silicone. Acetoxy (acid, vinegar-smell) sealants can corrode the metal hinges and clamps they touch and can stain natural stone. Neutral cure is the professional standard for shower hardware. Apply a consistent 1/8-to-1/4-inch bead, tool it smooth, and remove the tape before skin-over.
Respect the cure. A quality neutral silicone is tack-free in about 30 minutes, reaches basic cure near 24 hours, and full cure in 48 to 72 hours under normal conditions (20-25°C, 50% humidity). Keep the enclosure completely dry until full cure — premature water exposure whitens the bead and weakens adhesion. One hotel project we supported used an acetoxy sealant to save a few dollars per tube across sixty rooms. Within a season the metal hinge covers pitted, the stone sills discolored, and the entire floor was re-sealed on warranty. The material savings evaporated in labor.
Common Installation Mistakes & How to Avoid Them
- Trusting the stated opening. Always measure the finished tile, not the framed rough-in. Template to the tightest point.
- Ignoring wall plumb. Beyond 1/8 inch, the panel fights you at every adjustment. Shim or float the channel, but do not force the glass.
- Under-specifying hinges. Match hinge count to actual door weight. Two hinges are not a default for every door.
- Wrong anchor for the substrate. Hitting a stud beats any anchor. Where you cannot, use a verified heavy-duty system and document it.
- Sealing the sweep path. Trapped water is the root of most “frameless shower door leaking at bottom” complaints.
- Rushing the silicone cure. A same-day shower is a callbacks-to-come. Enforce the 48-to-72-hour dry window.
Post-Install: Adjusting Hinges & Fixing a Leaking Frameless Shower Door
Even a clean install needs a commissioning pass. Two issues dominate service calls.
Leaks at the bottom. Start at the sweep. Confirm the bottom sweep seats fully and the door overlaps the fixed panel by at least the seal width. Check the curb-to-glass seal for a continuous bead with no skips. A common cause is a door that has dropped a few millimeters on its hinges, opening a gap at the strike. Re-level the door first; re-seal second. For a deeper diagnostic, our hinge and leak correction resource walks through sweep, seal, and threshold fixes, and the shower seals and sweeps category covers replacement parts.
Frameless shower door hinge adjustment. Most modern hinges carry a built-in adjustment of roughly ±3 degrees via set screws. Loosen the locking screw, shift the door to even the reveal, and re-tighten in sequence. If the door still drifts, the hinge load rating is exceeded and you need an additional hinge, not more torque. Forcing a tired hinge only cracks the glass edge.
Safety, Maintenance & Inspection Schedule
Tempered glass is safe but unforgiving of impact at the edge. Brief every crew: lift with two suction cups, never lever glass with a screwdriver, and protect edges during transport.
A simple inspection cadence protects your warranty and the client’s bathroom:
- At handover: verify plumb, even reveals, smooth swing or glide, and a complete seal with no skips.
- 30 days: re-check hinge torque and sweep contact after the first thermal and use cycles.
- Every 6 months: clean tracks and sweeps, confirm the door self-centers, and inspect the silicone for separation.
- Annually: full re-seal if the bead shows tack, and confirm anchors remain snug.
Train maintenance teams to spot a weeping corner early. A small leak caught at the sweep costs nothing; the same leak behind tile costs a rebuild.
Sourcing Hardware & OEM Considerations for Brands/Contractors
For brands and contractors, the install is only as good as the supply chain behind it. Specify hardware that is load-rated, finish-consistent across a production run, and backed by a supplier who understands tempered-glass tolerances.
When you source, weigh these factors:
- Load ratings matched to your standard panel sizes so hinge count is a spec, not a guess.
- Finish durability — PVD or powder-coated finishes outlast plated in humid commercial use.
- OEM/ODM flexibility for custom hole patterns, branded packaging, and regional compliance.
- Lead time and batch consistency across a multi-room or multi-site project.
Zimmor supplies fabricators and brands in 136 countries with hinges, handles, glass clamps, and full shower hardware systems engineered for frameless enclosures. If you are specifying a production run or a custom enclosure program, talk to our team about OEM options and load-matched hinge kits — it is cheaper to get the spec right at the order than to adjust it at the threshold.
Frequently Asked Questions
Can you drill tile without cracking it?
Yes, with the right approach. Use a wet diamond core bit, start at low speed without hammer action, and let the bit cut rather than press. Support the tile, avoid grout lines, and back off if you feel a sudden change in resistance. A cracked tile at the hinge line means a re-tile, so the bit and patience pay for themselves. This is also the heart of any “how to install a frameless shower door on tile” job — the substrate is the constraint, not the glass.
Do frameless shower doors need to hit a stud?
Preferably, yes. Through-bolting into a stud or blocking is the most reliable hold for hinge loads. Where the fastening line lands on tile-over-cement-board, verified heavy-duty anchors rated for the pull-out load are acceptable. Tile set on bare drywall with no backing behind the anchor point should be flagged to the specifier before you drill.
How long does silicone take to cure before the shower can be used?
Plan for a full cure of 48 to 72 hours under normal conditions (around 20-25°C and 50% humidity). The bead is tack-free in about 30 minutes and reaches basic cure near 24 hours, but the enclosure should stay completely dry until full cure to avoid a weak, whitened seal.
Is frameless shower door installation a DIY or pro job?
For a single standard door, an experienced tradesperson can do it, but the margin for error is thin. Glass weight, anchor selection, and silicone cure discipline make this a professional-grade task. For commercial, multi-unit, or custom enclosures, use a qualified glazier — a mis-specified hinge or missed plumb check becomes an expensive return.
How do you fix a leaking frameless shower door at the bottom?
First re-level the door so the reveal is even and the sweep seats fully. Then confirm the bottom sweep and side seals meet the fixed panel without a gap, and that the curb-to-glass bead is continuous with no skips. If the door has dropped on its hinges, adjust or add a hinge before re-sealing. Trapped water from an over-sealed sweep path is a frequent hidden cause.
How many hinges does a frameless glass door need?
It depends on door weight and height, not a fixed rule. A door under about 80 lbs and 30 inches wide typically takes two hinges. Doors from 80 to 120 lbs, or taller than 78 inches, need three. Large or heavy panels run four. Always match hinge count to the panel’s actual fabricated weight.